![Featured image of post [Artificial Intelligence] - Building a Locally Hosted ChatGPT](/IA.png)
Syllabus
I tried to make this document as accessible as possible by avoiding overly technical terms. However, at certain points, this document will delve into the hosting of an artificial intelligence. At those times, I will do my best to provide explanations so that everyone can understand this article.
Introduction
Since November 2022, AI has experienced a new surge with the free availability of the ChatGPT language model by OpenAI. This democratization has led to an explosion in the number of available models, notably through platforms such as Hugging Face. In just one year, the number of these models has increased from 202,865 to 660,531, reflecting the enthusiasm for this technology.
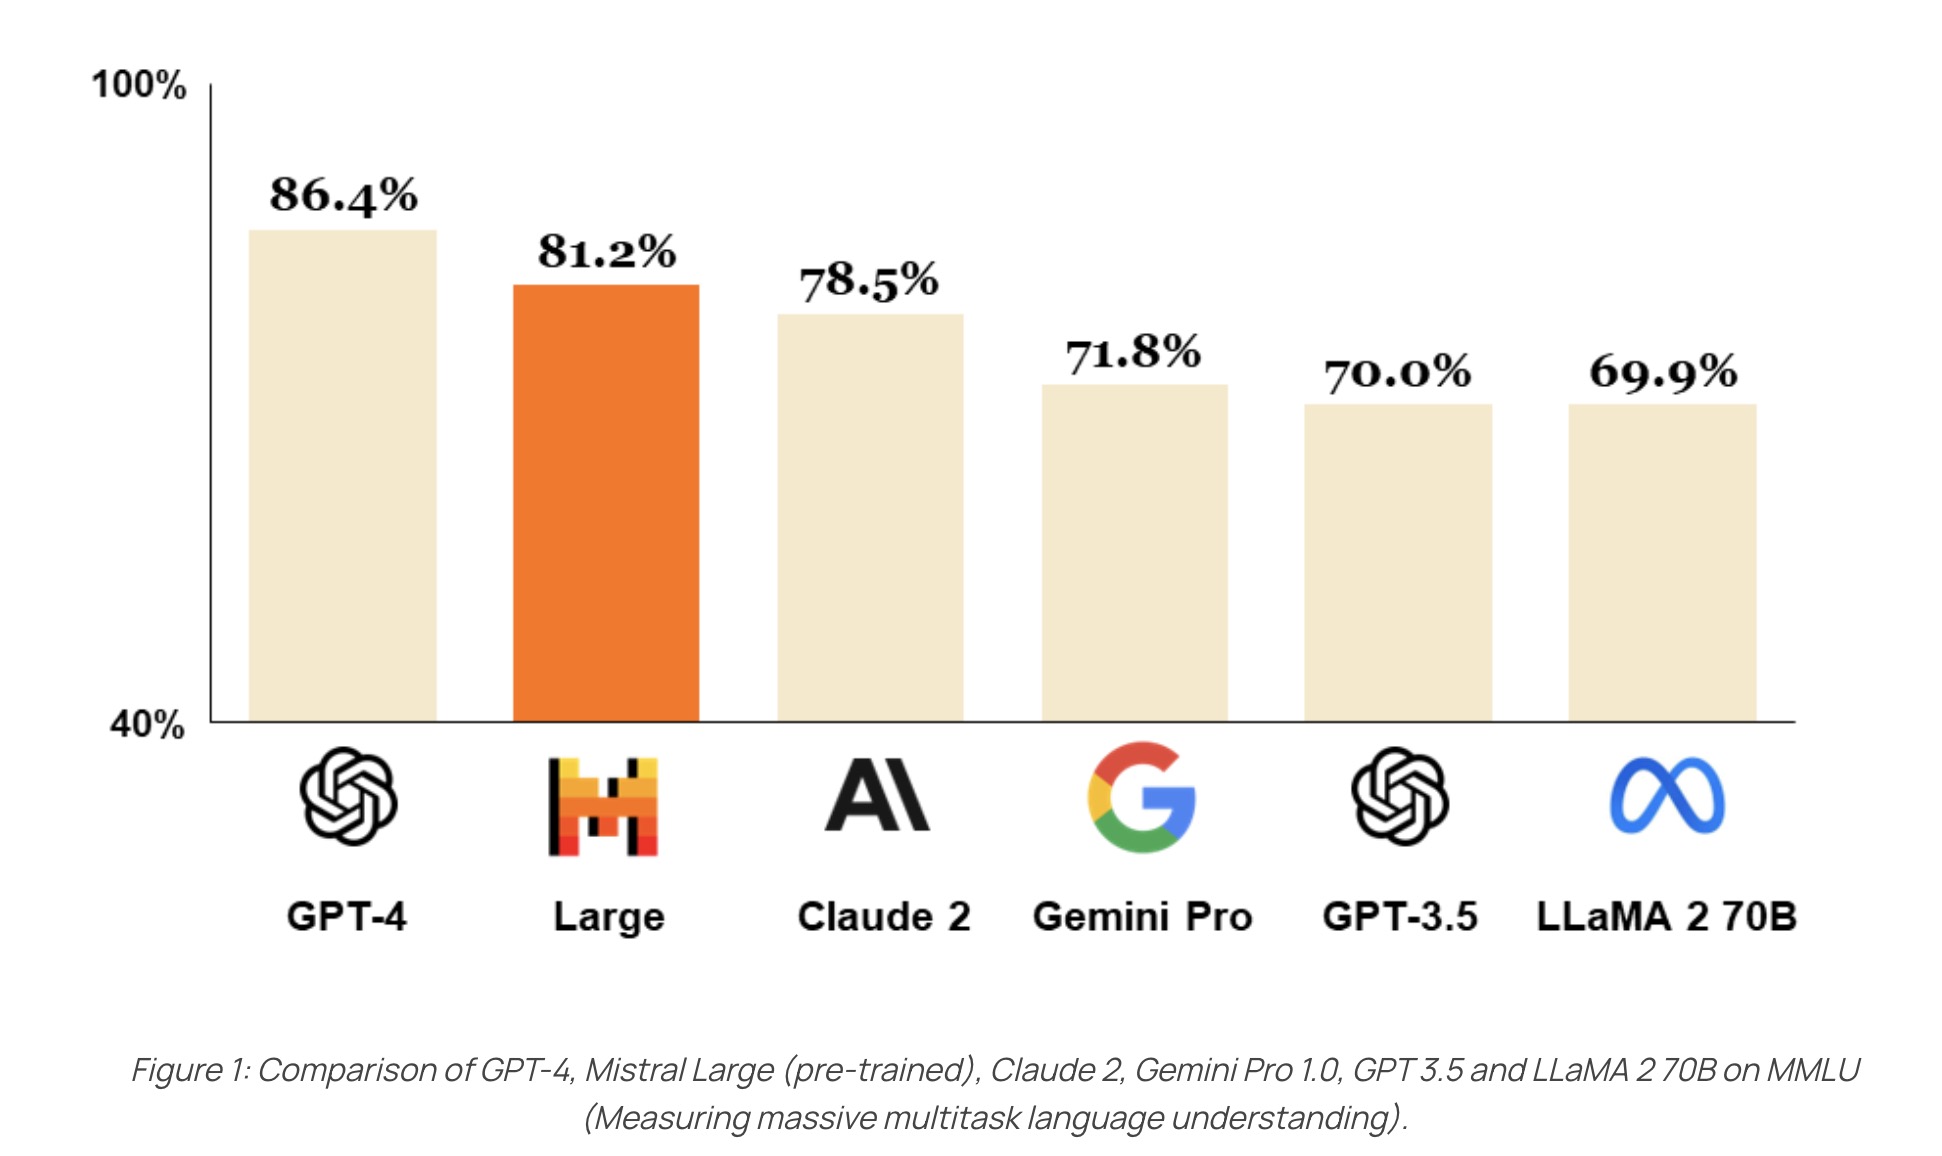
Amidst this growing increase, companies like Mistral have distinguished themselves by developing models that compete with industry giants such as ChatGPT and Meta. This competition has opened up new perspectives, as demonstrated by the comparative graph below.
In this article, we will explore building a conversation model similar to ChatGPT but hosted locally. To do this, we’ll take a practical approach using a Raspberry Pi 4B with 1 GB of RAM and a MacBook Pro M1 with 16 GB of RAM for model hosting. This approach, inspired by a NetworkChuck video titled “Host ALL your AI locally,” aligns with a growing trend towards prioritizing local hosting of AI models, providing users with more control and privacy. Additionally, it enables the use of custom models, better suited to specific needs and potentially outperforming generic models available online.
Explication des models utilisés
In our project to build a local ChatGPT, we rely on various Large Language Models (LLMs). These models facilitate the generation of coherent and relevant text, similar to that of ChatGPT. They are distinguished by their ability to understand and produce text intelligently, which is crucial for natural interactions with users.
LLMs are characterized by several aspects:
Size: This refers to the number of parameters (tokens) that these models can comprehend. However, it’s important to note that the quality of a model isn’t solely determined by its size. The model’s size can impact its performance, affecting both response speed and the quality of generated responses.
Comprehension Ability: LLMs are capable of making deductions based on the given text, enabling them to understand the meaning of the content beyond just the words themselves. This capability is essential for generating relevant and contextually appropriate responses across various usage scenarios.
Learning Technique: LLMs employ techniques such as parallel word processing and fine-tuning to enhance their understanding of text and performance in specific domains. This scalability enables them to adapt to specific needs.
In the context of our “project,” we have selected several models for their performance and specific features:
Mistral 7B Mistral Model: This Mistral model comprises 7 billion tokens. It’s the smallest Mistral model but the only one that can be executed on my Mac.
Llama-3 8B Lama Model: The latest Meta model rivals ChatGPT-4.
Dolphin-2.9.1-llama-3-8b Dolphin Llama: Another Meta model, less restrictive than others, offering great flexibility in text generation. It can be adapted and fine-tuned to meet the specific needs of the user, thus providing a customized solution for various usage scenarios.
The Dolphin model stands out for its flexibility and ability to adapt to a wide range of tasks. Unlike some other models that may have restrictions on topics or types of questions they can handle, the Dolphin model is designed to be more open, allowing users to ask questions without constraints. This feature makes it an ideal choice for conversing with our ChatGPT without having to worry about limitations.
Installation des models
After defining the models used, we will now define the architecture of our project.
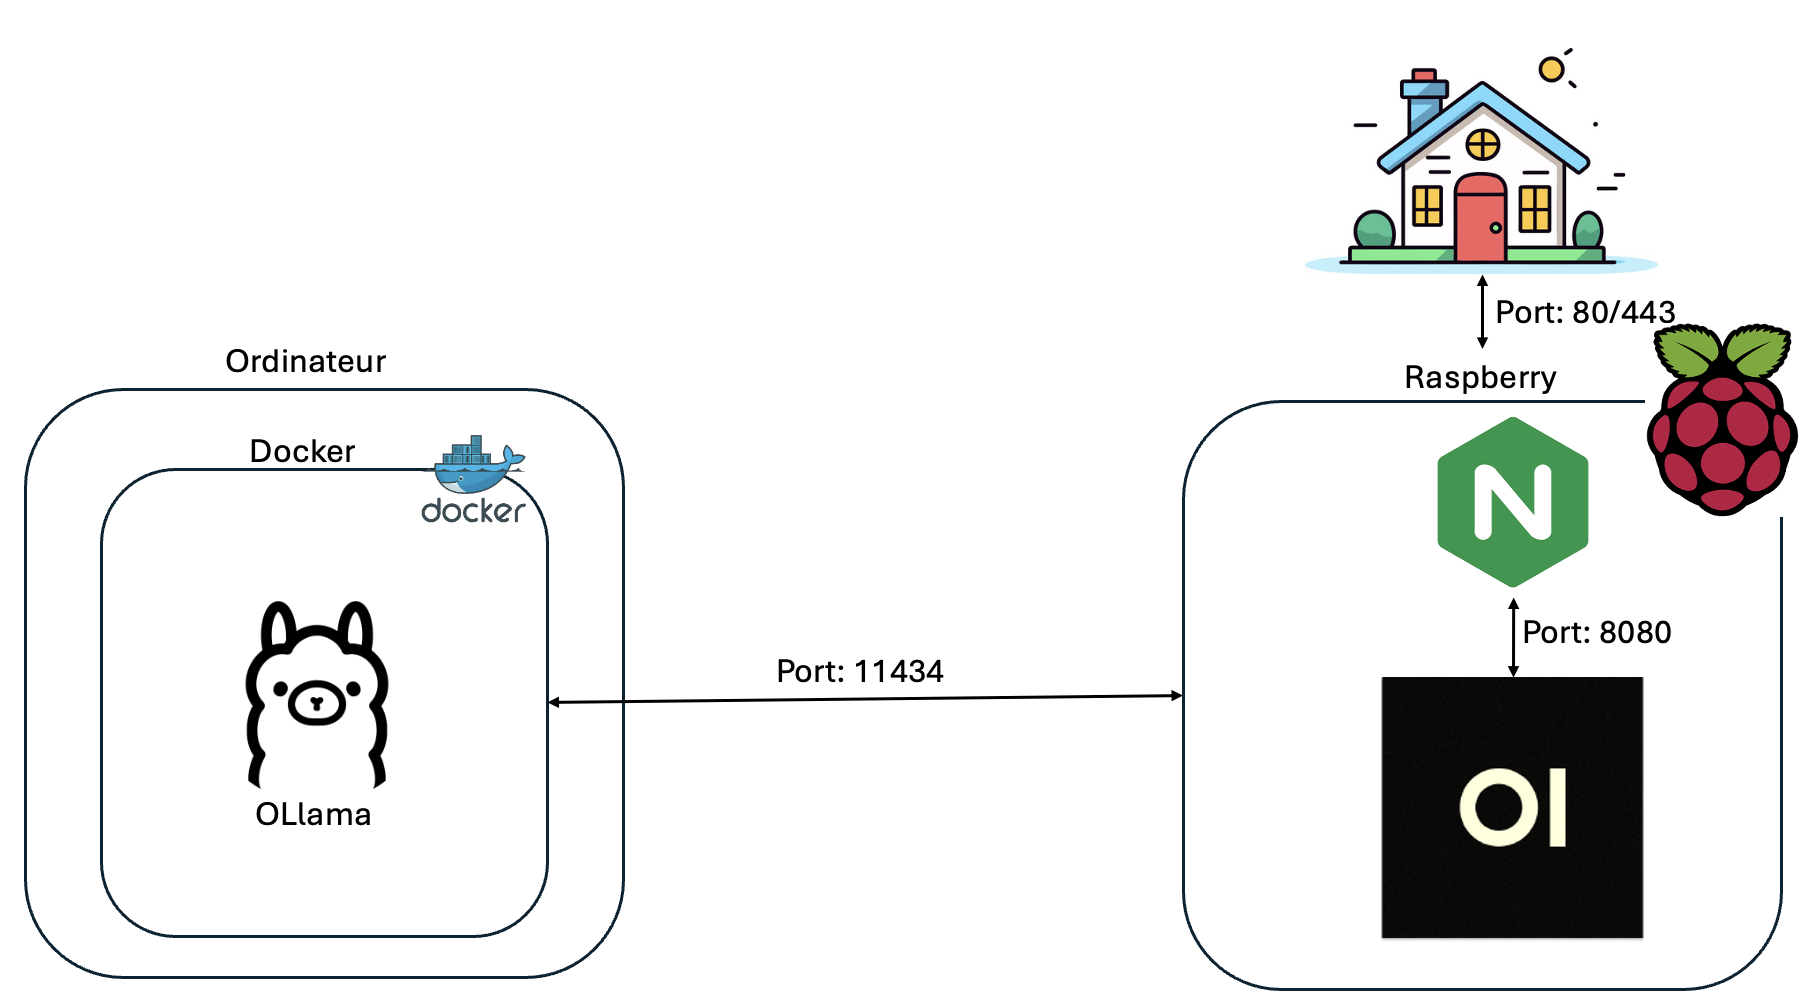
After defining the models used, we need to install Ollama, a framework for running LLMs locally. I wanted to install Ollama in a Docker container. For this, I’m using Docker Desktop since I’m on a Mac, but you can easily use Docker as well. (Installation: https://docs.docker.com/engine/install/debian/).
After installing Docker, we need to install the Docker image. Since I don’t have an Nvidia GPU, I launched the image using the following command:
docker run -d -v ollama:/root/.ollama -p 11434:11434 --name ollama ollama/ollama
However, if you have an Nvidia GPU, you can use this command to utilize your GPU:
docker run -d --gpus=all -v ollama:/root/.ollama -p 11434:11434 --name ollama ollama/ollama
Next, we need to run the three models mentioned above. To do this, we need to use the following commands:
docker exec -it ollama ollama run llama3
docker exec -it ollama ollama run mistral
docker exec -it ollama ollama run dolphin-llama3:8b-256k
After completing all these steps, we should normally have access to Ollama locally. To ensure this, we can check if we get a response when accessing the URL: http://<your-local-ip>:11434. If we receive the response: Ollama is running, it means that Ollama has started correctly.
Installation de l’interface graphique
To facilitate interaction with Ollama, we will install OpenWebUI, a graphical interface. OpenWebUI will enable us to manage and control the models easily, directly from our browser. To do this, we will follow these steps:
Étape 1 : Installation de OpenWebUI
We started by installing OpenWebUI on our Raspberry Pi, which must of course be connected to the same network as the Ollama instance. After installing Docker on the Raspberry beforehand, we launched the OpenWebUI image using the following command:
sudo docker run -d --network=host -v open-webui:/app/backend/data -e OLLAMA_BASE_URL=http://<server-ip>:11434 --name open-webui --restart always ghcr.io/open-webui/open-webui:main
Étape 2 : Configuration du reverse proxy
Once we connected Ollama to a graphical interface, our next step was to allow access to this web interface from any device on our network. For this, we used Nginx as a reverse proxy. We started by installing Nginx by running the following command:
sudo apt install nginx
Next, we modified the Nginx configuration as explained below:
server {
    listen 80;
    server_name 192.168.0.190;

    location / {
        proxy_pass http://127.0.0.1:8080;
        proxy_set_header Host $host;
        proxy_set_header X-Real-IP $remote_addr;
        proxy_set_header X-Forwarded-For $proxy_add_x_forwarded_for;
        proxy_set_header X-Forwarded-Proto $scheme;
    }
}
Finally, to apply this configuration, we restarted the Nginx service by executing the following command: sudo systemctl restart nginx
Configuration de OpenWebUI
Once the reverse proxy is configured, we can access the OpenWebUI platform. Simply go to the following URL: http://<raspberry-ip-address>. At this stage, we are prompted to log in. The first account we create will automatically be assigned the role of administrator.
Once logged in, we are greeted by the OpenWebUI interface, as illustrated below:
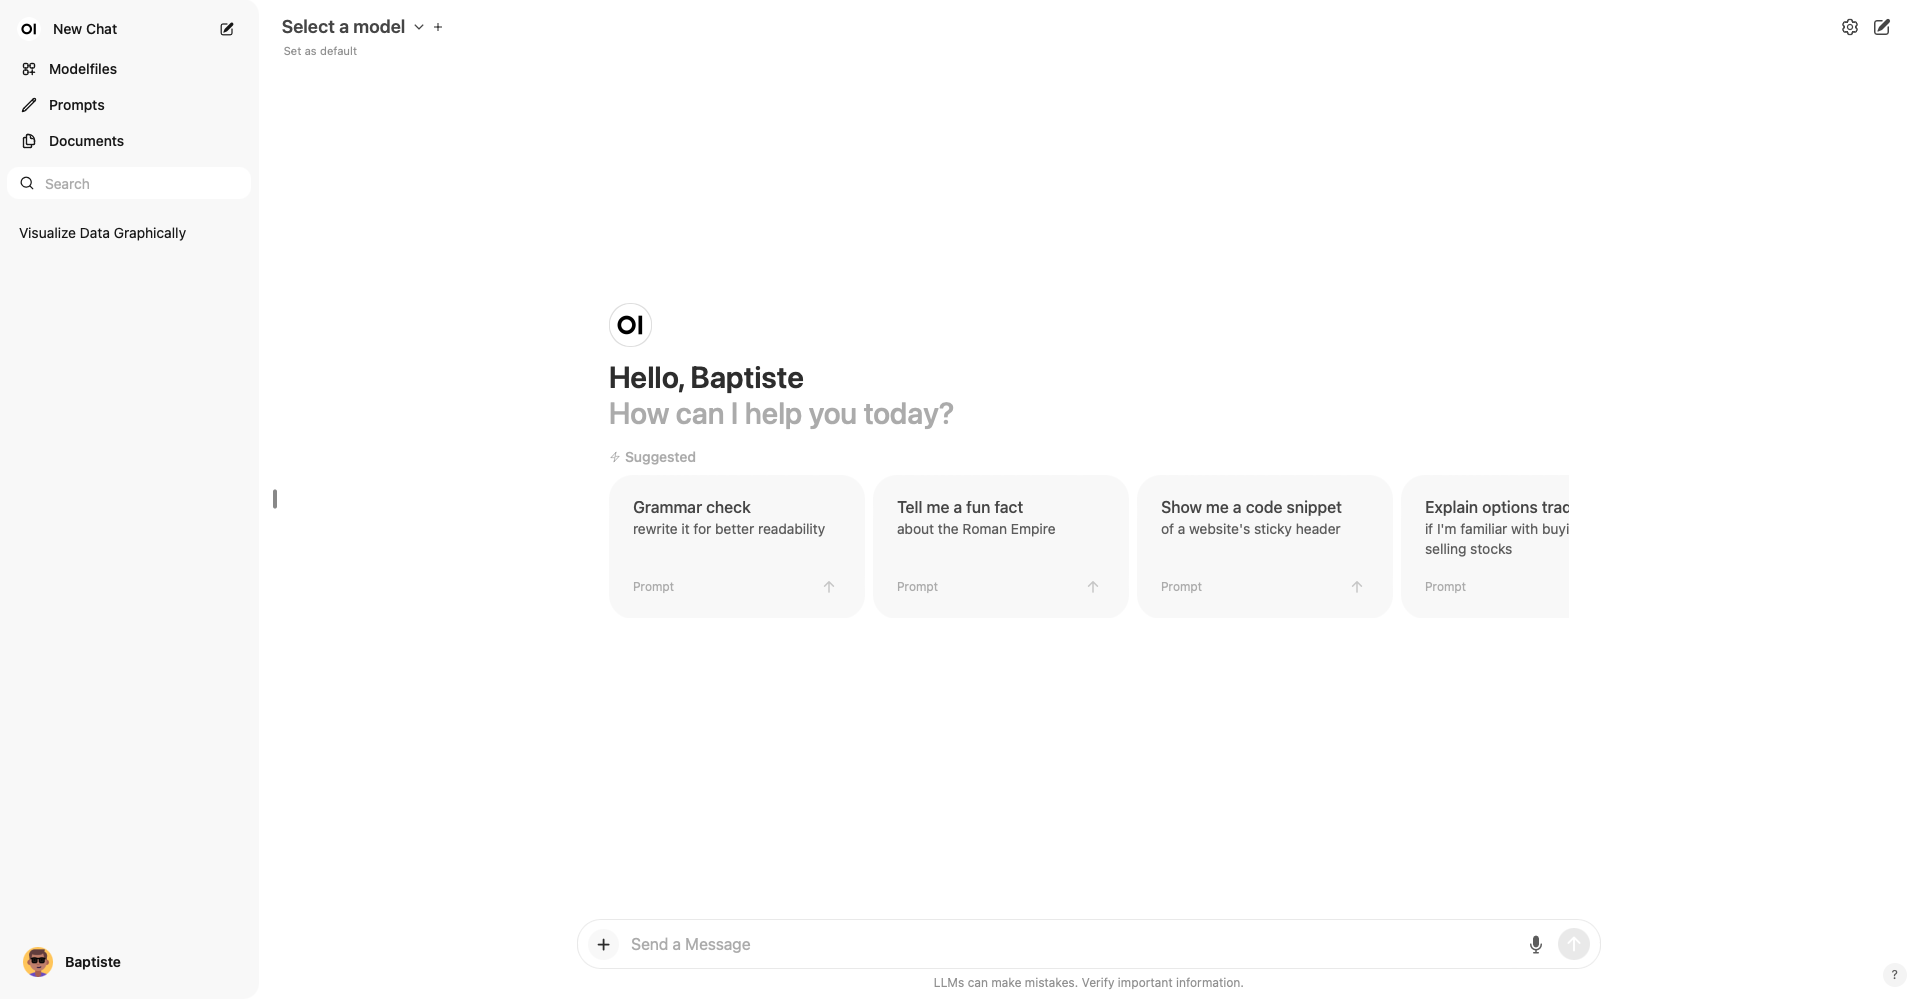
From there, we can access different sections and configure our instance according to our specific needs. Here are some main features we can explore:
- “Modelfiles” Section: This section allows us to customize the responses generated by our instance according to our preferences. For example, we can specify specific domains such as “Programming” and “Education” to improve the relevance of responses in these domains. This customization enriches the model’s context and helps obtain more accurate and tailored responses.
“Documents” Section: We have the option to provide text files to the Large Language Models (LLMs) used by our instance. These documents will serve as additional sources of information for the models, helping them better understand the topics discussed and improve the quality of their responses.
Assigning Tags to Prompts: Each prompt can be associated with one or more tags, facilitating their classification and later retrieval. This functionality allows us to efficiently organize our prompts and quickly find those of interest.
Furthermore, the built-in search function significantly simplifies the process of searching for past prompts.
Utilisation de différents models
In this final section, we delve into the concrete differences between the various models. It becomes evident from the first interactions that the Llama and Mistral models produce responses that are almost indistinguishable. However, the Dolphin model stands out remarkably. Its most notable feature lies in its ability to respond to a diverse range of questions without any apparent restrictions. For example, I recently requested a detailed explanation accompanied by examples on the complex concept of SQL injections, a topic that ChatGPT would likely have avoided. This flexibility offers an unprecedented openness to explore specific and varied subjects. Thus, the implementation of these models locally, in addition to ChatGPT, proves to be a particularly astute solution for detailed and in-depth conversations on complex topics.
Conclusion
Despite the slight difference in speed in generating responses from my local LLMs compared to ChatGPT, retaining my data locally remains a major advantage in my eyes. Furthermore, the flexibility offered by the ability to use the model of our choice is of paramount importance. Indeed, with the Dolphin model, we have the freedom to ask a wide range of questions without any limitations, a particularly beneficial feature in the field of cybersecurity. This adaptability is a considerable asset, thus enhancing the effectiveness of my interactions with local LLMs.